Select Lists
What do they do?
Select lists allow drop-down lists to be added to table transformations. This is useful whenever a predefined set of options should be made available to the editor. Select Lists can be customized to display icons, images, colors, etc. Select Lists can even be a dynamic list of files from a given file folder in Modern Campus CMS.
How do I install it?
Add the following code to: /_resources/xsl/common.xsl
Add to the common-headcode template:
<xsl:if test="$is-edt">
    <link rel="stylesheet" href="https://cdn.omniupdate.com/select-lists/v1/select-lists.min.css" />
</xsl:if>
Add to the common-footcode template:
<xsl:if test="$is-edt">
    <!-- jQuery 1.5+ is required. Add it here if not already included. -->
    <script src="https://cdn.omniupdate.com/select-lists/v1/select-lists.min.js" defer="defer"></script>
</xsl:if>
Note: jQuery version 1.5 or newer is required. If it’s not already being included, you’ll need to include it just before the select-lists.min.js reference.
Getting started
To add a select list add the data-select-list attribute and specify a declared select list (see Declaring Select Lists).
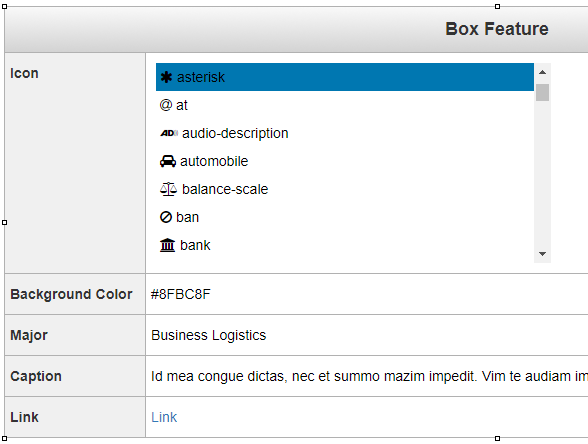
<td data-select-list="bootstrap-icons"></td>
Sample Select Lists that are available in this repository. Download zip here.
| Select List | Description |
|---|---|
| bootstrap-icons | Bootstrap Icons |
| cities | List of most populated US cities |
| cobycon-icons | Cobycon Font Icons |
| colors | List of all the CSS named colors |
| fa-icons | Font Awesome icons |
| majors | List of common academic majors |
| months | List of months |
| states | List of US states |
| weekdays | List of weekdays |
You can also specify the options inline. Values containing commas are treated as inline select list declarations. Option Parameters work with the inline method as well. For instance: :No Color,#0000FF:Blue,#FF0000:Red
<td data-select-list="Yes,No"></td>
Declaring Select Lists
There are two ways select lists can be declared.
-
JSON
- Create a JSON file which gets loaded via AJAX. The name of the file without the extension becomes the name of the select list. Sample JSON files are included in the repository. The default folder for JSON files is
/_resources/ou/editor/select-lists/. ThelineTemplatekey value stores the default line template for all the list options. Notice in the lineTemplate value below that the template variables{{value}}and{{text}}are available to be injected in the template. When thelineTemplatekey is omitted the value defaults to:{{text}}. Also note in the example below that the first “options” array item is supplying a template parameter. That template is applied to that line only. The rest of the options in this example fallback on the lineTemplate setting.
{
    "lineTemplate": "<span class=\"fa fa-{{value}}\"></span> {{text}}",
    "options": [
        ":No Icon:{{text}}",
        "address-book",
        "address-book-o",
        "address-card",
        "address-card-o",
        "adjust",
        "american-sign-language-interpreting",
        "anchor",
        "archive",
        "area-chart",
        "arrows",
        ...
    ]
}
Note: Colon (:) is used as a delimiter to designate option parameters value, text and template as shorthand syntax. If a colon needs to be included and you can accomplish this be placing the 3 options in an array like so:
{
    "options": [
        ["","No Icon : I placed a colon because I can.","{{text}}"],
        "address-book",
        "address-book-o"
    ]
}
You can also declare of dynamic list based on files on the Modern Campus CMS staging server by providing a root relative path to a given folder. To do this supply a
pathproperty instead ofoptions.{ "lineTemplate": "<img src=\"{{text}}\" /><p>{{value}}</p>", "path": "/_resources/images/samples/" }The
{{value}}maps to the root relative path of the file on the staging server while{{text}}maps to the absolute URL on the production server.Note: Select List JSON files do not need to be published since they are pulled in from the staging server.
- Create a JSON file which gets loaded via AJAX. The name of the file without the extension becomes the name of the select list. Sample JSON files are included in the repository. The default folder for JSON files is
-
Inline
- Allows you to declare your select lists right from the data-select-list attribute. Useful for small option sets. Options are comma delimited.
Sample inline values:
<td data-select-list="Yes,No"></td>
<td data-select-list=",Small,Medium,Large"></td>
<td class="background-image-class" data-select-list=":default,classrooms,library,stadium"></td>
Option Parameters
Each option item has 3 possible parameters delimited by colon(:) value[:text][:template] Options 2 and 3 are optional.
- value - This is the value that will get inserted in the table cell when clicking the option.
- text - This is the text value that can be used in the line template. When this is omitted it defaults to the value parameter.
- template - This overrides the lineTemplate for a single option item. When this is omitted it defaults to the
lineTemplatedeclared in the configuration. If thelineTemplatekey is omitted from the configuration this defaults to:{{text}}
Empty strings automatically resolve to {"value":"","text":"Nothing"}. There are 2 template variables that are always available for use in constructing the lineTemplate. {{value}} and {{text}}.
Option item examples:
"Yes" = {"value": "Yes", "text": "Yes", "template": "{{text}}"}
"" = {"value": "", "text": "Nothing", "template": "{{text}}"}
":None" = {"value": "", "text": "None", "template": "{{text}}"}
"true:Yes:{{text}}!" = {"value": "true", "text": "Yes", "template": "{{text}}!"}
Additional Options
Override the default location (/_resources/ou/editor/select-lists/) of JSON files by including a data-jsonpath attribute on the script tag.
For multi-site configurations you can keep all the Select Lists on a single site for easy management. To specify the site that stores the JSON files simply include a data-site attribute on the script tag. Omitting this attribute defaults to the current site.
<script
    src="https://cdn.omniupdate.com/select-lists/v1/select-lists.min.js"
    data-jsonpath="/_resources/select-lists/"
    data-site="global"
    defer="defer"
>
</script>
Tips
You can quickly jump to an item in the list by pressing the key the item starts with. For instance, in a long list of Colors you can press the Y key to jump straight to Yellow. Pressing Y again will jump to the next item starting with Y. You can use the up/down arrows to move through the list. Hitting enter will set the highlighted option. You can also press the Esc key to close the Select List and revert to the original value.